Life Lately + Some Family Photos

Tuesday, July 25, 2017

It's been soooo long since I posted... I know. And I keep saying "I'm going to start blogging again!", but you have seen how that's been going. LOL! Until I am finally able to really start posting again, I wanted to give a quick update about our lives because I truly intend to get back to consistently posting soon!!

If you don't follow me on Instagram or know me personally, here's a very condensed version of the past two years. Obviously you all know that I have always wanted lots of kids... and the quicker the better, but God's plan was different for us. After all we went through to have Kate we figured we'd just start trying for another baby basically as soon as she was born. Kate was a huge fan of breastfeeding to the point that it ended up being it's own natural birth control. Once she finally started eating solids, I had a couple sporadic cycles and to our surprise (given everything we did to conceive Katie) we found out we were expecting in April of 2016. We were so excited that it happened all on it's own without endless doctor visits, ultrasounds, medications, etc. Then I started spotting two days before I hit the 12 week mark. We were scheduled for our first ultrasound that week and I was spotting so lightly that we weren't really concerned about it. Darren and I were giddy with excitement as they started the ultrasound, but quickly turned solemn as we watched the tech struggle to find a heartbeat. She told us she saw not just one, but two babies, but that there were no heartbeats. We were shocked. Our first two miscarriages were at 6 weeks so we weren't expecting it to happen this late. It hit us hard, but despite how devastated we were, that maternal desire for more children drove me to want to keep trying despite the extreme emotional and physical pain it might cause.


So we tried again. And a few months later, somehow my body said "OK!" and I got pregnant. No medication - just lots of love. The way it's supposed to be. We were wary at first, but as the weeks went on we started to hope. Then, just like the last pregnancy, we lost our fifth angel baby right at 12 weeks. We started to think there was an underlying issue and our doctors agreed. So ensued loads of blood work for me, genetic testing for both of us, etc. Everything came back normal until an ultrasound showed a large uterine polyp. My doctor couldn't say for sure if that had caused our last two miscarriages, but I needed surgery to remove it regardless. I had the surgery in January of 2017. 


In February, a month after my surgery, I got a positive pregnancy test. We held our breath for every milestone. We passed the 6 week mark, when we lost our first two pregnancies. At 8 weeks we got to see our miracle for the first time. My doctors completely understood how fearful we were and offered to let me come in for weekly doppler checks at that point. It helped keep the worry *somewhat* at bay. Weeks 11-13 were the scariest for me. At one point around 12 weeks, I had myself convinced that something was wrong and rushed into the doctor's office. They brought in the handheld ultrasound and there he was (yes, HE!) kicking and flipping all over the place! 


Fast forward to today. I'm currently 27 1/2 weeks pregnant! Things have been going great. Other than combating loads of worry during the first trimester, it's really been a wonderful pregnancy so far. You guys have no idea how thankful and blessed we feel. We know we are some of "the lucky ones" on this journey of infertility and miscarriage. Never for a second do we take our two miracle babies for granted!!

These are some of the photos that we had taken last month by Tyler White Photography, who is a friend I have known since Jr. High, but also happens to be a phenomenal photographer. If you are anywhere near the Bloomington or Indianapolis, IN area, I highly recommend you use Tyler and his wife, Casey, for your photography needs! They are the sweetest and so incredibly good at what they do. 


If you're still following along with the blog, I would love to hear from you! Let me know what kind of things you'd like to see here in the future. I appreciate any and all feedback from my readers. Thanks for hanging with me through this lengthy post! I'm really hoping that this will be the restart of a wonderful new blogging journey for me. xoxo, Hannah

Etsy Shop Closing

Monday, January 16, 2017


In 2010 I opened up Katie Darling Paper Co. (known then as Bahana Splits Boutique) as a venue to sell cards that I made in my free time. I had no idea that within 3 years my "hobby" shop would sell over $65,000 worth of my very own handmade goods and craft supplies and that I would be shipping orders all over the globe. I had zero business education, no marketing or SEO skills, and no idea how to be a small business owner. What I did have was "want to" and Google. :) I read books about starting a business and product photography. I read every single help article Etsy published for sellers... I mean it!! Every single one. I say all this to say, anyone can do this if they want it bad enough. Don't ever doubt yourself.


Circumstances in my life have changed A LOT since my business took off. I became a mama in 2014. That changed everything. I've discovered many things about myself too... one of those being that I'm not the kind of parent that can pull myself away from my kid when we're home together to focus on my business. I wish I were better at that, but I'm not. Given the choice, I always choose Kate and as a result, my business has taken the back seat in my life. But that's ok. I'm ok with it. I've decided to close my shop so that I can wholeheartedly enjoy my time at home with my family without the guilt knowing that my business is suffering because I'd rather not pull myself away from them when we're together.

I'm so grateful for the past 6 1/2 years. I've learned so much and have been able to meet and interact with so many amazing people. Some of my best memories are of my husband staying up late with me to help package orders, my shop being featured on Etsy's home page, participating in craft shows, surpassing 10,000 orders, and getting a call from Real Simple magazine to send them samples. My stuff didn't make the final cut for the spread, but it was still such an honor to be chosen as an option!! It's been a wonderful experience and I'm so thankful to every one of my customers. You are the ones who made it happen.

Lastly, I want to thank my husband for supporting me and sticking with me through the ups and downs of running a creative home business. Only you and I know the scale of all you've done.

Changing gears now!! Everything that is left in the shop has been discounted and is ready to ship. In addition to the already reduced prices, you can use the coupon code GOODBYE for an extra 25% off. Link to shop HERE.

Thank you again from the bottom of my heart. 


- Hannah -


White Chocolate Sauce Recipe (healthier & cheaper than Starbucks!)

Tuesday, March 22, 2016


Today I'm sharing a recipe which is a first for me! I love to bake. I could do it all day every day and be happy. Cooking is a totally different story (my husband can testify to my lack of skills in that area) so you'll probably never see me sharing any sort of cooking recipe here! But not to fear, because I classify coffee related recipes as baking. K? OK!!  :)


The main reason I decided to make the switch from my usual store bought white chocolate sauce to homemade was because of the ingredients. Starbucks' white chocolate sauce ingredients include high fructose corn syrup, potassium sorbate, and monoglucerides... all of which can be harmful to your health. My homemade recipe has zero preservatives and no high fructose corn syrup! #winning

The second reason for the change was because of the price difference. My recipe costs approximately $14.00 for 63 ounces versus their $25.00 for 63 ounces. It makes sense to take 5 minutes a week to save $11.00, right? I think so. 

Just a warning... this recipe is very sweet! If you're not a fan of sugary coffee concoctions then this is not for you. However if you like your daily dose of caffeine to taste sweet then you've come to the right place! I love to add this to my morning coffee combined with a little peppermint syrup (recipe coming SOON!) to make a Peppermint White Mocha drink. Peppermint is my favorite and I refuse to wait all year until the Christmas holiday to have it so I make it on the reg and let me tell you - my taste buds thank me every time. 

Without further ado... here is my take on a Starbucks Copycat White Chocolate Sauce. 


White Chocolate Sauce Recipe
Yields 18-20 ounces 

Ingredients:

1 Can (14 oz) Sweetened Condensed Milk
1/2 tsp. Pure Vanilla Extract
1/4 cup of Milk - try to make sure the expiration date on the milk is at least a week away
1 Bag (11 oz) White Chocolate Chips

Pour sweetened condensed milk, vanilla, and milk into microwaveable glass bowl and stir ingredients together. Heat in microwave for 30 seconds. Remove from microwave and add white chocolate chips. Stir and microwave for 30 seconds. Stir again and continue to microwave for 15-30 seconds at a time, if needed (stirring in between microwave sessions) until chips are melted. It usually only takes me 1-2 minutes max for my chocolate chips to melt. Be careful not to over cook!


Pour mixture into a mason jar and refrigerate. The sauce will harden in the refrigerator. This is normal! Once you scoop it out and add it to your hot coffee it will melt pretty quickly. Try to use within 7-10 days.


What drinks will you add this sauce to? This coffee addict would love to hear your feedback and ideas!! 

xoxo,
Hannah


Friday Favorites - Pillowfort by Target

Friday, March 4, 2016

Have any of you mamas been to Target lately?! I finally got the chance to see some of the Pillowfort collection in person last weekend and oh. my. word.... I am IN LOVE! Coincidentally, a plan had already been in the works to make a playroom for Kate with shades of mint, coral, and pink in mind so when I initially walked down the Pillowfort aisle at Target I may have hyperventilated for a brief second. It's a decorating lover's dream when you have a vision of a room in your head and then walk into a store and see nearly every piece that you need to complete said room. Here are some of my favorite things from the collection that I'm dying to get my hands on and a little preview of the inspiration I have for Kate's play space. 


What are some of your favorite pieces from the collection and would you use them in a kids room or somewhere else in your home? Please do tell, because I'm looking for reasons to buy every single item!  :)  Happy Friday!

xoxo,
Hannah

Friday Favorites - Painted Trim

Friday, February 19, 2016

This week's Friday Favorites is all about the new trim trend! I'm usually pretty boring in the fact that I really love plain white trim. It's classic, clean, and you just can't go wrong with white. However, lately I've been drawn to the painted trim look. I love how it draws your eye to the trim rather than just the wall color. I'm not saying I'm ditching my white just yet, but these pictures are making me do some serious thinking about adding a little color to my trim game.

SOURCE
SOURCE
SOURCE
Add caption
Add caption
SOURCE

 What are your thoughts on this trend? Would you do it? What color is your favorite?

xoxo,
Hannah

DIY Banner Wall Hanging (with no sew option)

Tuesday, February 9, 2016


I have had the materials for this project for umm..... about a year. Which is awful. I can't believe it took me this long to get to it. 2016 definitely needs to be the year for this girl to kick her bad procrastinating habits to the curb for good! Wish me luck with that, would ya?!  :) This beauty was worth the wait, however! I absolutely love how it turned out. It has it's imperfections, but it was handmade by me for our miracle baby and so I think it has a special place in my heart for that reason. 

I was super intimidated when I first thought about trying to make a canvas wall hanging. I do that a lot (psych myself out) and I'm sure some of you do the same, but I'm here to tell you that this was much easier than I anticipated it would be and I would venture to say that even a beginner DIY-er could successfully complete this project. 


MATERIALS

Here are the things you will need to make this banner wall hanging:

Materials -
  • Lighweight Canvas or Fabric to make your banner
  • Felt for the letters (you could also use fabric, leather, cardstock, etc.)
  • Twine or Yarn to hang banner and to make decorative tassel (optional)
  • Dowel

Tools -
  • Glue Gun or Sewing Machine (either will work great!)
  • Scissors
RECTANGLE PIECE FOR BANNER BASE

STEP 1.) Make sure to iron your canvas or fabric that you are going to use for the banner base before you start. Next, decide how big you want to make your banner. I just proportioned mine to the 12 inch long dowel that I purchased. Before I hemmed any of my edges my rectangle piece measured 14 inches long (from top to bottom) and 10 inches wide (from side to side). 


SIDES FOLDED OVER BEFORE HEM

STEP 2.) Fold over the left and right sides of your banner base about 1/2 inch to make a hem. Make sure to iron them down before you attempt to sew or glue them. DO NOT SKIP THIS STEP. You will regret it if you do - - - >  #beentheredonethat. Hem the sides with a sewing machine or glue gun (both work just as well). 


BACK OF BANNER SHOWING DOWEL CASING

STEP 3.) After the sides of your banner are hemmed, you can move to the top of the banner to create the casing for your dowel. My dowel was 1/2 inch in diameter so I folded my fabric over 1 1/2 inches to make sure there was ample room to slide in the dowel. Next you can sew or glue the casing. Then you are ready to insert your dowel. Can you see it starting to take shape now?!

STEP 4.) I don't have any pictures of this part, because honestly I struggled with getting the points on my banner to look the way I envisioned them. Halfway through this step (after I had already made the cut) I realized I should have stuck with an easier banner shape like THIS ONE. It would have made this project go more seamlessly and saved me some time. 

STEP 5.) Now for the fun part!! After your banner base is complete you are ready to decorate and bedazzle it to your heart's content. Since Kate's nursery theme is very soft and sweet I stuck with a neutral palette and simple design. I enlisted the help of my Cricut machine to cut out paper letters to use as a guide before cutting my felt because my scissor skills are horrible and I didn't trust myself to be able to freehand the letters. After my felt letters were cut out I used a hot glue gun to attach them to the banner. Lastly, I made a fun little tassel out of baker's twine to add a little whimsy (awesome tassel tutorial HERE) and then tied twine around the dowels to create the hanging piece. 


I haven't decided exactly where I want to hang my banner yet, but I had so much fun moving it around the room to take pictures for this post! Honestly, it looked perfect in just about every place I put it. It's such a versatile piece and I hope that when she's older Kate will love it as much as I do. What do you think about the finished product? Is this something that you would attempt? 

You guys, it feels so wonderful to be blogging again! Thank you for taking the time to read this tutorial! Make sure you tell me if you try this project. I would LOVE to see what you create!!!

xoxo,
Hannah


Friday Favorites - Fixer Upper

Friday, February 5, 2016

Yes, I have been away from this blog for SO LONG, but I promise I'm not letting her go just yet!

I want to kick off my first post in forever with a new series I hope to do every week. Friday Favorites! Some of you may recall my Things I'm Loving Thursday posts in the past... Friday Favorites will be similar to that. Only it's way easier to say. Actually that's pretty much the only difference. 


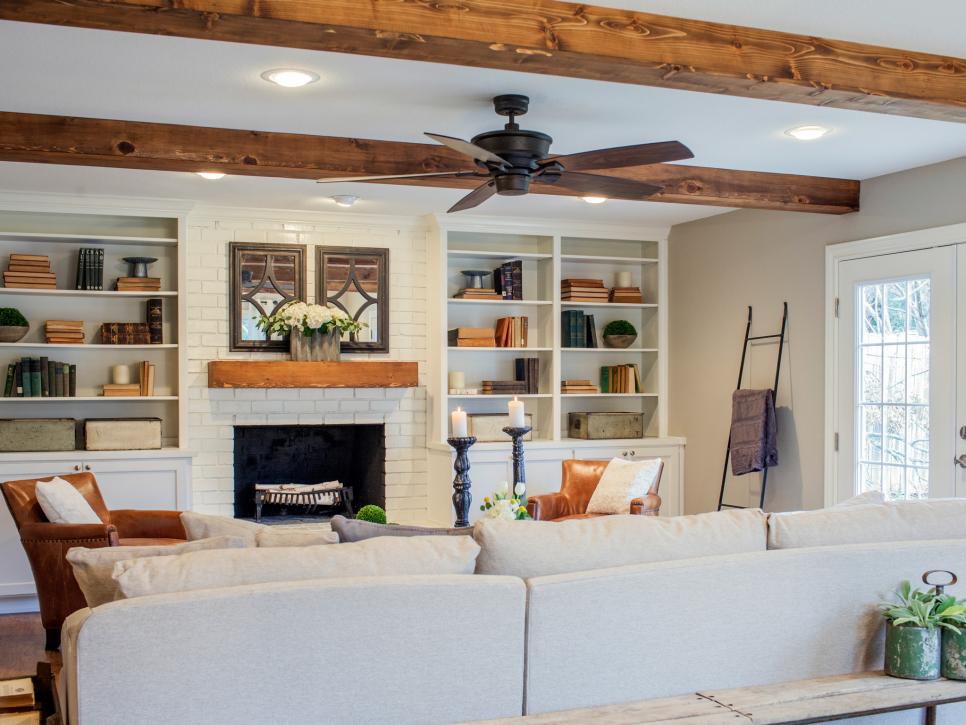
SOOOO! Let's kick it off! This one actually seems like a cop out, because really - who isn't obsessed with Chip and Joanna Gaines of HGTV's Fixer Upper?! You guys, I'm telling you Joanna has pretty much rewired my decorating style hard drive since I began following the show. I was already making the move away from modern decorating which was my style when I first became a homeowner nearly 8 years ago, but Fixer Upper just pushed me over the edge. Can we say #shiplap E-VER-Y-THING! Darren (the hubby) thinks I've lost my mind, because I'm asking if we can wood plank a wall in our house about twice a week. Here are some of the Fixer Upper projects that I'm googly eyed over lately. 


What are your favorite things about Fixer Upper and Chip & Joanna's style? Have you incorporated any of her ideas into your home yet? If so, I would love to hear what they are and how your projects turned out!

Also.... what do you think about the new blog look? I thought it was time for a refresher. Simple, basic, and pretty florals are the new black in my book! It's so good to be back in bloggyland! Happy Friday, lovelies.

xoxo,
Hannah
Baby Kate

Monday, March 23, 2015

Oh my goodness, you guys - I just realized it's been over a year since I blogged on a regular basis!! While that makes me sad (because I seriously love blogging) I'm also ok with it because my hiatis was for a good cause. :)  I am not one of those super women who can juggle everything at once so I had to let the blog go for a bit during my pregnancy and Kate's newborn baby stage. Speaking of Kate... I want to officially introduce you to her! These pictures were taken when she was 3 weeks old by She Designs Photography


Katherine Noel Hutslar was born at 9:48am on December 30, 2014. It was an extremely long labor, but it was (of course) worth every second of pain the moment they placed her in my arms! Kate was 6 lbs. 15 oz.,19 inches long, and had a head full of dark hair. Here are some more of my favorite pictures from the lifestyle photo shoot we had with Karalea Payne when Kate was 6 weeks old.


I hope to get back to writing on a regular basis very soon. I already have a few DIY projects up my sleeve that I can't wait to work on and share! Tata for now... will write more soon!

Hannah

Thoughts of a Survivor During Pregnancy After Infertility

Sunday, August 3, 2014


To the ones who are still waiting, hoping, and praying for their miracle... this is for you.


Believe it or not, "survivor's guilt" (for lack of a better description) is a real thing during pregnancy after infertility. At least it has been for me. Maybe I feel it more than most because I've been so open about my journey and as a result have come into contact with thousands of women who are waiting day after day for a miracle. Maybe it's because infertility changes you in a way that just can't be forgotten. Maybe it's even the occasional thought that someone else deserves a baby even more than I do. I mean... why have I been blessed with the gift of pregnancy while so many other amazing women are still waiting, praying, and begging God for their wombs to be filled?

Regardless of the why... the thought that I am one of the lucky ones has been something I've struggled with. Please don't get me wrong... I am thankful beyond belief to finally be carrying a healthy baby! I wouldn't trade it for anything. I am enjoying every minute of being pregnant and thank God often (but not nearly enough) for the precious life that is growing inside me.

The whole point of this post is so that the women out there that are still in the thick of fighting their battle with infertility know that you haven't been forgotten. I have thought of you every day since I got my good news. I still pray for you and I still feel your pain. You're not alone in your journey and you still have a voice on this blog. I know that you're happy for me, but that you're sad for you. And that's ok. I understand, because I've been there. I remember how it feels and I haven't forgotten that sting.

I feel so happy and blessed that I have been given the incredible opportunity to carry a life inside me... I truly hope that every one of you will be able to feel this same joy one day. Until then, I will weep with you, I will pray for you, and I will remember your pain.

xoxo,
Hannah 
Related Posts Plugin for WordPress, Blogger...

Powered by Blogger · Designed by Pish and Posh Designs